Auto-brightness means you shouldn’t need to change your iPhone screen brightness yourself. Here’s what to do if it isn’t working.
Auto-brightness ensures your iPhone’s screen brightness levels adapt automatically according to the light around you. For example, when you step out in the sun, the brightness increases. And inside a room, it decreases. When your iPhone auto-brightness feature doesn’t work, it can spoil your user experience and even consume more battery.
If auto-brightness isn’t working on your iPhone, you can use these solutions to fix it. Once that’s done, it should be more comfortable to use your iPhone during the day, night, and any other times.
- Clean the ambient light sensor at the top of your iPhone screen
- Restart your iPhone, or force restart it if a regular restart doesn’t help
- Toggle Auto-Brightness off and back on in Settings > Accessibility > Display & Text Size
- Update iOS in Settings > General > Software Update
- Turn off Low Power Mode in Settings > Battery > Power Mode
- Turn off Night Shift and check True Tone in Settings > Display & Brightness
- Disable Attention Aware Features in Settings > Face ID & Passcode (Face ID iPhones only)
- Let your iPhone cool down if it’s been running hot
- Remove a thick screen protector or case that covers the sensor area
- Reset All Settings in Settings > General > Transfer or Reset iPhone
1. Clean Your iPhone’s Front Screen Area
The ambient light sensor is at the top of your iPhone screen. Body oils, sweat, and other such gunk may stick to this sensor when holding the phone to your ear during long calls. Due to this, it may stop your iPhone’s ambient light sensor working, which is what’s responsible for adjusting the screen brightness according to your surroundings.
To fix this, use a clean, dry cloth to wipe the top portion of your iPhone screen. After this, auto-brightness should work fine. If not, move on to the next solution.
2. Restart Your iPhone
If you haven’t turned off your iPhone in a while, it can cause a few problems, like auto-brightness not working correctly. To fix this, simply restart your iPhone. After the device powers on, everything should work as well as it usually does.
If a regular restart doesn’t fix it, try a force restart. Press and quickly release Volume Up, then press and quickly release Volume Down, then press and hold the Side button until the Apple logo appears on screen.
3. Enable and Disable Auto-Brightness
Another quick solution to fix the auto-brightness problem on your iPhone is to turn this feature off and on. Here’s how to do that:
- Open the Settings app.
- Tap Accessibility.
- Tap Display & Text Size.
- Turn off Auto-Brightness.
- Restart your iPhone.
- Go to Settings > Accessibility > Display & Text Size and enable Auto-Brightness.

4. Update Your iPhone
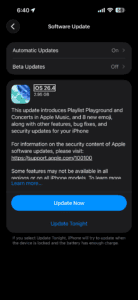
Auto-Brightness is a native iOS feature, so it’s also important to make sure that the iPhone is running smoothly. The best way to do this is to install the latest iOS software.
To update your iPhone, go to Settings > General > Software Update. If an update is available, tap Update Now.
5. Turn Off Low Power Mode
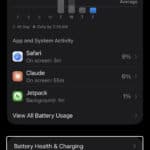
Go to Settings > Battery > Power Mode and check that Low Power Mode is switched off. When it’s on, iOS automatically caps your screen’s maximum brightness — and that happens even if the auto-brightness feature is otherwise working correctly.
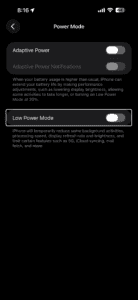
This one catches a lot of people off guard. Annoyingly, it kicks in automatically when your battery hits 20% (and again at 10%, whether you meant it to or not) — so you can end up running around for hours with a dimmed screen and never connect the dots. It stays on until you manually switch it off, or until your battery climbs back to 80%. Worth a quick check.
6. Try Turning Off Night Shift
We’ve heard from people who said they had success fixing iPhone Auto-Brightness problem by turning off Night Shift. Here’s how to turn off Night Shift on your iPhone:
- Open the Settings app.
- Tap Display & Brightness.
- Tap Night Shift.
- Turn off Manually Enable Until Tomorrow and Scheduled.
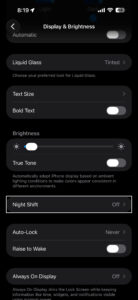
7. Check True Tone
Go to Settings > Display & Brightness and toggle off True Tone. This feature adjusts both the color temperature and the brightness of your screen based on the light around you, which can make it look like auto-brightness has stopped working when True Tone is actually the one changing things.
On iPhone 8 and later — meaning every current iPhone model — True Tone switches on by default. It’s great, usually. Adjusting your display’s color temperature to match the room is what it was built for, and under normal conditions you barely notice it running. When something goes wrong with the sensors it reads from, your screen can end up looking warm and dim all the time — which a lot of people mistake for auto-brightness breaking on them.
8. Disable Attention Aware Features
If your iPhone has Face ID, go to Settings > Face ID & Passcode, enter your passcode, and turn off Attention Aware Features. This feature uses the TrueDepth camera to detect whether you’re actually looking at the screen, and when it thinks you’ve glanced away, it dims the display to save battery.
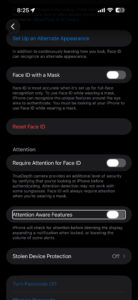
At first, you might not notice. Attention Aware was designed as a battery-saving measure, and for most people it works fine, but there are iPhones — especially older ones, or iPhones that have been through a screen repair — where the camera sensor reads “not looking” far more often than it should, leaving the display stuck at a lower brightness than you set. Turning it off removes one more variable from the equation.
9. Let Your iPhone Cool Down
If your screen has gone dim and none of the previous steps have helped, set your iPhone down in a cool, shaded spot and leave it alone for about five minutes. Overheating is often the culprit. When the iPhone detects that its internal temperature has climbed too high, it dims the screen automatically as a protective measure — and that can happen during long GPS navigation sessions, extended gaming, or even wireless charging in warm weather.
Apple doesn’t let you disable this behavior — it’s a hard limit built into iOS. Running Apple Maps with the screen at full brightness in direct sunlight is probably the most common trigger (especially in summer, or if the iPhone is also charging at the same time), but gaming, video streaming, and long FaceTime calls can push things to the same point. Let it cool down for five minutes and the screen should come back to normal on its own. If it’s still dim after that, or if the phone feels warm even when it’s been sitting idle, that’s a sign something else is going on and it’s worth a trip to the Apple Store.
10. Remove Any Thick Screen Protectors
iPhone displays are very sensitive. If you are using an abnormally thick screen protector on your iPhone, it’s possible that it’s causing problems with the smooth working of the ambient light sensor. To address this, consider removing your screen protector. If you must use one, opt for a screen protector that’s thinner, or medium thickness, instead.
Similarly, if you have a case that covers the entire front of the device, or even partially blocks the top sensor area, remove that as well.
11. Reset All Settings
When you reset all settings, personal data like downloaded apps, music, photos, videos, and such won’t be deleted. However, all the settings you have customized to your liking will reset and return to the default options. This includes Wi-Fi, Bluetooth, VPN configurations, Home Screen layout, keyboard settings, and more.
After you reset all your settings, several problems such as auto-brightness not functioning should be fixed. Here’s how to do it:
- Open the Settings app.
- Tap General.
- Tap Transfer or Reset iPhone.
- Tap Reset.
- Tap Reset All Settings.
- Enter your device passcode to confirm.
Once it completes, your iPhone should adjust the screen brightness correctly based on the light around you.
Problems With Third-Party iPhone Displays
Did you break your iPhone screen and get it replaced at by an unauthorized service provider? If yes, it may cause multiple problems, like Face ID not working correctly, True Tone not functioning, and possible auto-brightness issues.
Reach out to Apple support for repair options. Apple offers mail, phone, online, and in-person help. Make sure to schedule an appointment if you plan on going into your local Apple Store!
Auto-Brightness Makes Your iPhone Easier on the Eyes
After following the above fixes, your iPhone display should automatically adjust the screen brightness to match your environment, ensuring that the screen is always comfortable to look at.
If auto-brightness still doesn’t work on your iPhone, you may want to turn off auto-brightness and adjust it manually until you get your device inspected at an Apple Store instead.
If none of the above have solved it, reach out to Apple Support before booking an in-person visit — they can run a remote diagnostic on your device and determine whether the ambient light sensor is even responding. Go to support.apple.com to get started. Persistent auto-brightness issues that survive a Reset All Settings and a software update almost always point to a hardware fault with the sensor, and that’s something only Apple or an Apple Authorized Service Provider can properly diagnose and repair.