• Skip to primary navigation
  • Skip to main content
  • Skip to primary sidebar
  • Skip to footer

iPhoneArena

APPLE IPHONE, MAC, WATCH AND IPAD

  • Home
  • iPhone
  • iPad
  • Mac
  • Apple Watch
  • Bug Fixes
  • How to
  • Tips and Tricks
  • Apps
You are here: Home / Archives for Moses Johnson

Moses Johnson

Moses Johnson is the Editorial Director of iPhoneArena and has been writing about iPhones, iPads, Macs, accessories, and software for over 10 years.

No Internet connection on your iPhone? Here’s The Fix

By Moses Johnson · March 27, 2026

Seeing the dreaded No Internet connection on your iPhone? We’ll show you the steps to follow when you have no internet access but are still connected to Wi-Fi on iPhone.

  • Check if the problem affects all your devices or just your iPhone
  • Restart your iPhone, then restart your router and modem
  • Toggle Airplane Mode on and off to refresh your wireless connections
  • Update your iPhone to the latest version of iOS
  • Disable any active VPN connections
  • Forget the Wi-Fi network and reconnect with your password
  • Turn off Wi-Fi Assist in your Cellular settings
  • Switch your DNS settings to Google or Cloudflare
  • Reset your network settings as a last resort

Sometimes your iPhone will say it’s connected to Wi-Fi, but a “No Internet Connection” message appears below the name of your network. If your iPhone is experiencing this problem, this article explains the steps to fix it.

Why is my iPhone saying no internet connection?

Before we proceed, we should explain what’s happening on your network when your iPhone is connected to Wi-Fi but says “No Internet Connection.” This requires knowledge of some home networking basics.

Wireless devices, like an iPhone, connect to your router. The router is a device that manages the network connections for the devices in your home. Your router plugs into a modem, a device that bridges the traffic on your home network to the wider internet.

When your iPhone says “No Internet Connection,” it means that your iPhone is connected to the router correctly, but can’t reach the internet.

This gives you some clues about the issue, as we explain below.

Fix Wi-Fi Connected But No Internet Access On iPhone

1. Confirm Other Devices Can’t Connect Either

Before you do any troubleshooting, it’s important to determine whether your iPhone is the only device with no internet connection. Grab your computer (or another device connected to your Wi-Fi network) and see if it’s online—try streaming a YouTube video to check.

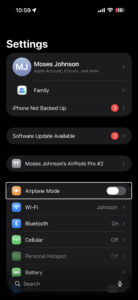
On some Android versions, this problem is indicated by an X icon over the Wi-Fi symbol in your status bar (you’ll be connected to your mobile network for data). iPhone and iPad users can visit Settings > Wi-Fi and check for a “No Internet Connection” message under your network name.

If your iPhone won’t connect but other devices will, this is likely due to a misconfigured setting on your iPhone. But if you have no internet on every device, the problem lies with your Wi-Fi router and you can thus skip some of the iPhone-only steps below, as noted.

2. Reboot Your iPhone

This step isn’t necessary if your connection issue is affecting multiple devices.

As with many issues, rebooting your iPhone is the first troubleshooting step you should try. If you’re lucky, you might clear up any temporary bug by restarting, which will fix your iPhone network connection issue.

To reboot your iPhone, simultaneously press and hold the Side button and either Volume button. Drag the Slide to Power off slider from left to right to shut down your iPhone.

Wait a few seconds, then turn your iPhone on again by pressing and holding the Side button until the Apple logo appears on the screen.

3. Toggle Airplane Mode

Open Settings and tap the Airplane Mode toggle to turn it on, wait about 15 seconds, then tap the toggle again to turn it off. When Airplane Mode is enabled, your iPhone kills all wireless connections at once — Wi-Fi, Bluetooth, and cellular — and turning it back off forces your iPhone to reconnect to everything from scratch.

Screenshot showing airplane mode setting on iPhone

This works differently from toggling Wi-Fi on its own, because Airplane Mode clears the entire wireless stack rather than just one connection. If your iPhone had grabbed a bad network configuration or got stuck in a half-connected state (which is a lot more common than you’d think), this one toggle can shake it loose. You can also do this from Control Center by swiping down from the top-right corner and tapping the airplane icon, but using the Settings app is more reliable because Control Center sometimes leaves Wi-Fi on even in Airplane Mode.

4. Reboot Your Modem and Router

Since most network issues involve your modem and router, rebooting them is a wise early step. While some routers offer the option to reboot through their web interface, you don’t need to do this. Pull the power plug from both devices and leave them unplugged for a few minutes—or use the physical power button if there is one.

Power up the modem again first, letting it fully boot up before you plug in your router again. Wait a few minutes to make sure both are running. While doing this, confirm that your router and modem are working properly. If you don’t see any lights on one of the devices, or the lights appear red or flash in an irregular pattern, you may have a bad piece of network hardware.

If your iPhone says “No Internet Connection” even after this, continue—your issue is more complex than a basic reboot.

If your router broadcasts separate 2.4GHz and 5GHz networks, try connecting to the other one. A 5GHz connection is faster but weaker through walls, so if you’re far from the router, switching to 2.4GHz might give you a more stable connection. You’ll see both network names listed under Settings > Wi-Fi — they often have a suffix like “-5G” or “-2.4G” to tell them apart.

5. Check Your Date and Time Settings

Please make sure that the date and time on your iPhone are set correctly. Go to Settings > General > Date & Time. Turn on the toggle next to Set Automatically.

Date and time settings on iPhone

If the date and time on your iPhone are wrong — even by a few hours — it can cause SSL certificate validation to fail, which means your iPhone won’t be able to establish a secure connection to most websites and services. That’s why you’ll see “No Internet Connection” even though your Wi-Fi link to the router is perfectly fine. The problem tends to show up after a factory reset or after your iPhone’s battery has fully drained and been recharged.

6. Update Your iPhone Software

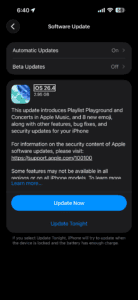
Go to Settings > General > Software Update and check whether a new version of iOS is available for your iPhone. If there is one, tap Download and Install.

iOS updates sometimes include fixes for Wi-Fi bugs that Apple introduced in a previous release, and this particular “No Internet Connection” issue has shown up repeatedly after certain updates — iOS 16.4, iOS 17.1, and iOS 18.5 all had reports flooding Apple’s support forums. If you can’t download the update over Wi-Fi (because, well, you have no internet), you can connect your iPhone to a computer with a USB cable and update through Finder on a Mac or the Apple Devices app on a PC. It’s a bit of a pain, but it’s worth checking off the list before moving on to more disruptive fixes.

7. Disable Any VPN Connections

Using a VPN has benefits, but it also adds a layer to your internet connection setup. As a result, what you think is an issue with your home network connection could be a problem with your VPN. Sometimes a VPN will time out if you’re connected for too long, or you could be using an overloaded server that can’t handle your connection.

If you’re running a VPN, whether through an app, a manual connection on your iPhone, or on your router, disable it and try to get online again. If the VPN is an app, just turn it off from within, but if it’s in the Settings app, follow the steps below:

Go to Settings > General > VPN & Device Management. Turn off the toggle next to Status at the top, changing it from Connected to Not Connected.

If that doesn’t fix it, keep the VPN turned off for the rest of your troubleshooting to reduce the number of variables.

If you don’t use a VPN on purpose, check this setting anyway. Some users on Apple’s forums have reported that a VPN profile left over from a deleted app — or from a work configuration — can silently interfere with your connection. You might see the VPN & Device Management toggle flickering on and off on its own, which is a dead giveaway. If there’s a VPN profile listed that you don’t recognize, tap the i icon next to it and tap Delete VPN.

8. Forget Your Wi-Fi Network And Reconnect

To forget a Wi-Fi network on your iPhone, open Settings and tap Wi-Fi. Then, tap on the information button (look for the blue i) to the right of the Wi-Fi network you want your iPhone to forget. Then, tap Forget This Network.

After forgetting the network, you can go back to Settings > Wi-Fi and tap on the network name again to reconnect. You’ll also have to reenter the Wi-Fi network’s password after forgetting it on your iPhone.

While you’re in the Wi-Fi settings for your network, check the Private Wi-Fi Address setting too. Since iOS 18, this is no longer a simple on/off switch — tap Private Wi-Fi Address and you’ll see three options: Off, Fixed, or Rotating. On most home networks with WPA2 or stronger security, iPhone defaults to Fixed. Try setting it to Off, then tap Rejoin when your iPhone asks. If that clears the “No Internet Connection” message, your router was having trouble with the randomized address, not your iPhone.

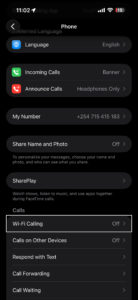
9. Disable Wi-Fi Assist

Go to Settings > Cellular, scroll all the way to the bottom of the screen, and turn off the toggle for Wi-Fi Assist.

Wi-Fi Assist is an iOS feature that automatically switches your iPhone over to cellular data when your Wi-Fi signal is weak, and Apple enables it by default. The problem is that when it kicks in while your Wi-Fi is technically connected but not passing traffic, your iPhone can get stuck bouncing between the two — it sees Wi-Fi, tries to use it, fails, switches to cellular, detects Wi-Fi again, and loops back. Turning it off forces your iPhone to commit to the Wi-Fi connection entirely, which makes it easier to tell whether the issue is actually with your Wi-Fi or somewhere else. You can always turn it back on once everything’s working again.

10. Change Your DNS Settings

Tap the information button (the blue i) next to your connected Wi-Fi network in Settings > Wi-Fi, scroll down and tap Configure DNS, switch it from Automatic to Manual, and enter 8.8.8.8 and 8.8.4.4 (Google’s DNS servers) or 1.1.1.1 and 1.0.0.1 (Cloudflare’s). Delete any existing DNS entries by tapping the red minus icon next to them.

DNS is what translates a website name like “apple.com” into the actual numerical address your iPhone needs to connect. Your router normally hands your iPhone the DNS servers from your internet provider, but if those servers are slow or temporarily down, your iPhone will act like it has no internet even though the connection itself is working. Switching to Google’s or Cloudflare’s DNS servers routes those lookups through a different path entirely, and in my experience this fix is the one that catches people off guard — the Wi-Fi is fine, the router is fine, but the ISP’s DNS was the bottleneck the whole time.

While you’re on that same Wi-Fi settings screen, you can also try forgetting the network and rejoining it, which forces your iPhone to request a fresh IP address from your router. (In older versions of iOS, there was a Renew Lease button that did this without forgetting the network, but Apple removed it back in iOS 15.) Grabbing a new IP can fix the problem if your iPhone was assigned an address that conflicts with another device on the network.

11. Check Your ISP’s Status

If you still can’t get any devices online, it’s worth checking if your internet service provider (ISP) is having an issue. Maybe the internet is down in your area. Though this is rare, it could explain why you have no internet access across devices. Contact your Internet service provider. It’s also possible your account has issues. Maybe you forgot to pay your bill and they disconnected your Internet. Simply contact them.

12. Reset Your Network Settings

If you’ve proceeded through all these steps and still have the “no internet access but connected” problem on your iPhone, there’s not much you can do other than reset your network settings.

If your iPhone is the only device you can’t connect with, you can reset its network settings by going to Settings > General > Transfer or Reset iPhone. Tap Reset, then Reset Network Settings.

This step resets Wi-Fi networks and passwords, cellular settings, and VPN and APN settings that you’ve used before. You’ll have to set everything up again, including VPN software, but it might be the fix you need.

If you’ve tried every fix on this list and your iPhone still says “No Internet Connection,” the next step is to contact your internet service provider and ask them to check for issues on their end — outages, account flags, and modem configuration problems are all things they can diagnose remotely and you can’t from your iPhone. If your ISP confirms everything is normal on their side, then it’s time to contact Apple Support or book an appointment at an Apple Store. There’s a small chance the Wi-Fi antenna in your iPhone has a hardware fault, and that’s something only Apple’s diagnostics can confirm. Whatever you do, don’t skip the ISP call and go straight to Apple — most of the time when nothing in this article works, the problem turns out to be on the provider’s end.

Contacts Not Showing on iPhone? Here’s The Real Fix

By Moses Johnson · March 27, 2026

Follow this guide to find out what to do if some of your contacts aren’t showing up on your iPhone.

Every time you want to contact someone in your contact list, a simple search should show their number. However, there are instances when some or all of your contact names don’t show up on your iPhone.

If contacts aren’t showing up on your iPhone, you can use this guide as a fix. But before we dive into the different options, remember that various problems can make your iPhone contacts disappear.

And therefore, there are various solutions that you can use to fix it. So, try each of these methods and see which one helps to restore contacts on your iPhone.

1. Restart Your iPhone

One of the first steps you should try when contacts are not showing up on your iPhone is to restart your phone. Sometimes when mobile devices run for a while, they may run into issues. Restarting your iPhone will help give it a fresh start and thus may help fix minor issues you’re facing, including contacts not showing up, sluggish performance, app crashes, and so on. Simply turn your iPhone off and back on. Once your iPhone is back up and running, confirm if your contacts have been restored. If not, move on to the next solution.

2. Resync Your Contacts With iCloud

If contacts are still not showing up on your iPhone, try resyncing your Contacts app with iCloud. We’ll do this by disabling iCloud access to Contacts and then re-enabling it again. Here’s how:

  1. Open the Settings app on your iPhone.
  2. Tap on your name at the top of the screen.
  3. Tap iCloud.
  4. Tap See All.
  5. Toggle off Contacts.
  6. Select Keep on My iPhone to save copies of synced contacts to your iPhone. You can also select Delete from My iPhone if you want. Don’t worry; this option doesn’t make your contacts disappear.
  7. Re-enable Contacts again. And if your iPhone asks to merge existing contacts, select Merge.

Resync Your Contacts With iCloud

After that, give your device a few minutes, then check to see if your contacts have been restored. If you’re still facing problems, read on for more solutions.

3. Show All Contacts in Your Phone App

Contacts might not show up on your iPhone because you have hidden some of them. You may not know this, but your iPhone usually places your contacts in groups based on your connected accounts. To see all your contacts, no matter their group, you need to ensure all groups are visible.

So, follow these steps to show hidden contact groups:

  1. Open the Phone app on your iPhone.
  2. Tap the Contacts tab.
  3. Tap Lists in the upper-left corner, then select All Contacts to view all your saved contacts.

Show All Contacts in Your Phone App

If some contacts from a particular account weren’t showing up on your iPhone, this should fix the issue. However, read on if you still don’t see all your contacts.

4. Update iOS on Your iPhone

Go to Settings > General > Software Update and install any available update. If one is waiting, tap Download and Install, enter your passcode, and let your iPhone finish before you check your contacts again.

Apple’s iOS updates regularly patch bugs that affect system apps, and the Contacts app gets caught up in these glitches more often than you’d expect — especially right after a major iOS release. If your contacts vanished after an update, or you’ve been ignoring that little red badge on your Settings icon for weeks, installing the latest version can quietly fix the whole thing. Make sure your iPhone has at least 50% battery (or plug it in) before you start the download.

5. Add All Your Accounts to Your iPhone

If you have several accounts that you use, chances are contacts might be saved across them. To fix this, you need to add all your accounts to your iPhone to ensure you have access to all your contacts. So, follow these steps to add an account to your iPhone:

  1. Open the Settings app on your iPhone.
  2. Scroll down and select Apps.
  3. Tap Contacts.
  4. Tap Contacts Accounts. You’ll see all accounts that are currently added to your iPhone.
  5. Tap Add Account, select the type of account, and log in using your credentials.

Add All Your Accounts to Your iPhone

After successful login, the account will appear under Settings > Apps > Contacts > Contacts Accounts.

If you don’t see any contacts from the newly added account, follow the steps in the next tip to ensure contact visibility.

6. Modify Your Contact Account Settings

Your Accounts settings also affect the visibility of your contacts. You need to ensure that all your connected accounts have Contacts sync enabled. To do this, follow these steps:

  1. Launch the Settings app on your iPhone.
  2. Scroll down and tap Apps.
  3. Tap Contacts.
  4. Tap Contacts Accounts. You will see all your connected accounts listed here.
  5. Tap each account and ensure Contacts is toggled on.

If contacts from one of your connected accounts weren’t showing up on your iPhone, this should help fix the issue.

Additionally, you can try disabling and enabling Short Name on your iPhone. While this feature is handy to ensure more names fit on the screen, it can sometimes be problematic. To do this, go to Settings > Apps > Contacts > Short Name. Disable Short Name, then wait about 15 seconds then turn it on.

While you’re in those settings, it’s also worth checking your Default Account. Go to Settings > Apps > Contacts > Default Account and make sure it’s set to the account where most of your contacts are stored — usually iCloud. If the default is set to a Gmail or Outlook account you barely use, new contacts you save might end up in an account that isn’t syncing properly, and older contacts tied to iCloud may not show up at all in certain apps like Messages or Phone.

7. Sign Out and Back Into Your iCloud Account

Go to Settings, tap your name at the top, scroll all the way down, and tap Sign Out. Choose Sign Out But Don’t Erase so your data stays on the device, then follow the onscreen prompts. Enter your device passcode or Apple Account password when asked, and tap Confirm and Sign Out.

Once you’re signed out, restart your iPhone and then sign back into your Apple Account through Settings. After signing in, give it a few minutes to sync everything. This is a step that fixes a different problem than the iCloud resync in step 2 — resyncing just refreshes the Contacts toggle, but signing out and back in forces your entire Apple Account connection to rebuild from scratch, which can clear up deeper sync errors that a simple toggle won’t touch. It takes a bit longer and you’ll need to re-enter your password, but if nothing else has worked so far, this is the one that tends to break the logjam.

8. Rebuild Your iPhone Contacts

Another way to troubleshoot contacts not showing up on iPhone issue is by force rebuilding them. To do this, you’ll have to edit one of your contacts first, then restart your iPhone. Here’s how:

  1. First, select any visible contact from the Phone app and select Edit in the top right.
  2. Add some new details—they don’t have to be accurate. You can add a fake email, address, note, or anything.
  3. Once done, tap Done in the top right and then restart your iPhone.

When your iPhone powers on, it will have to rebuild all the contact names and details. Once your iPhone restores all the contacts, you can delete the fake information you added to the contact above. Check if your contacts have been restored after a few minutes. If this doesn’t solve your issue, try data recovery tools.

9. Reset Network Settings

Go to Settings > General > Transfer or Reset iPhone > Reset > Reset Network Settings. Enter your passcode when prompted, and your iPhone will restart on its own.

This one won’t delete your contacts, photos, or apps — but it will wipe every saved Wi-Fi password, Bluetooth pairing, and VPN configuration on your device. That’s why it sits this far down the list. Your iPhone syncs contacts over the network, and if something in the connection stack is corrupted or stuck (which is more common than people think, particularly after switching between Wi-Fi and cellular on a spotty connection), the sync between your iPhone and iCloud can quietly stall. Resetting the network settings forces iOS to rebuild all of those connections from the ground up, and once your iPhone reconnects to Wi-Fi, it’ll attempt a fresh contact sync with iCloud. You will need to re-enter your Wi-Fi passwords afterward, so make sure you have them handy before you start.

10. Recover Lost Data Using iCloud or Data Recovery Tools

Before you try third-party data recovery tools, we advise using iCloud first.

  1. Sign in to iCloud.com with your Apple Account.
  2. Scroll down to the bottom of the page and click Data Recovery.
  3. Click Restore Contacts. Available versions are listed by the date and time they were archived.
  4. To the right of the version you want to restore, click Restore.

There may be more versions than can be displayed. Scroll to see them all.

Note: Wait until iCloud finishes restoring your contacts before you change them. During the restore process, any changes you make aren’t saved.

Tip: If you recently deleted a contact either from iCloud.com or your iPhone, it may take up to 24 hours for the archive to appear.

If that doesn’t work, you can try using third-party data recovery tools to restore your contacts. There are a variety of affordable tools on the market for the job.

11. Seek the Help of Apple Support

If all else fails or you don’t want to spend money on third-party data recovery tools, you can get tech support with the Apple Support app for more assistance.

Alternatively, you can reach out to them via Apple’s support website. Either way, a certified expert should help sort out the issue in more ways than we could.

If you’ve gone through every step in this guide and your contacts are still missing, the problem may not be something you can fix on your own. A corrupted iCloud sync on Apple’s server side, an account-level issue, or even a rare iOS bug that hasn’t been patched yet could be behind it — and Apple Support has tools to diagnose those things that aren’t available to you or me. When you contact them, mention which steps you’ve already tried so they don’t walk you through the same fixes again.

Restore Missing Contacts on Your iPhone

Contacts not showing up on iPhone issue has been reported by many users. If it has also happened to you, don’t panic. There are a variety of ways to fix the problem. In summary, you could restart your iPhone, resync with iCloud, show all contacts in your Phone app, add all accounts to your iPhone, modify account settings, or force rebuild your contacts.

If none of these solutions work for you, you can try restoring lost contacts from your iCloud backups. If that fails, make sure to contact Apple’s support team for further help. Using third-party data recovery tools should be your last resort, as you will certainly have to pay for it. Hopefully, one of the free methods works for you.

Call Failed on iPhone? Here’s Why and Fix!

By Moses Johnson · March 26, 2026

A call failed message could be a problem with your cellular provider or your iPhone.

You should toggle Airplane mode, restart your phone, and reset your SIM card.

You can also reset your iPhone’s network settings, but that will erase passwords.

Enabling Wi-Fi Calling can fix calls that fail due to a weak cellular signal.

Check that Do Not Disturb and Call Forwarding aren’t silently blocking your calls.

There you are, about to make an important call when your iPhone suddenly flashes the dreaded “Call Failed” message. Your heart sinks, and frustration kicks in. What went wrong?

Why Does My iPhone Say Call Failed?

When your iPhone keeps showing a “Call Failed” message, it usually means the device couldn’t maintain a connection with the cellular network. This could be due to a wide range of issues—from a weak signal to iOS glitches.

Common reasons why your iPhone says “Call Failed”:

  • Signal dropped.
  • Network congestion.
  • Problem with cellular network.
  • SIM card issues.
  • Problem with the Phone app.
  • Carrier-related problems.
  • iOS glitch.
  • Do Not Disturb or Focus mode silencing incoming calls.
  • Call forwarding pointing to an unreachable number.

How to fix “Call Failed” on iPhone

If you’re trying unsuccessfully to place a call, here are the most common ways to fix the call failed error on an iPhone:

Try your call again

The first thing you should do when you encounter “Call Failed” error on your iPhone is to try making the call again. Often, a call will fail thanks to a temporary signal drop, and the call will work just fine a minute later. Before you do anything else, tap the dial button to redial your last number.

Close All Of Your Apps

It’s possible the call failed on your iPhone because of a glitch with the Phone app. Closing and reopening the app can fix a minor software glitch. We recommend closing all of your apps, just in case a different apps has crashed in the background.

  • Open the app switcher by double-pressing the Home button (iPhones without Face ID) or swiping up from the very bottom of the center of the screen (iPhones with Face ID).
  • Swipe your apps up and off the top of the screen.
  • Open the Phone app again and try making a call. If the call still fails, move onto the next step.

Turn Airplane Mode On And Off

One of the most common reasons a call fails on your iPhone is because of a glitch with your cellular connection. You can fix this by turning Airplane mode on and off.

  • Go to Settings.
  • Turn on Airplane Mode.
  • Wait five seconds.
  • Turn off Airplane Mode.

Screenshot showing airplane mode setting on iPhone

Enable Wi-Fi Calling

If calls keep failing, go to Settings > Apps > Phone > Wi-Fi Calling and turn on Wi-Fi Calling on This iPhone.

Wi-Fi calling setting on iPhone

Wi-Fi Calling sounds like a minor setting, but it’s one of the more reliable fixes for this specific problem. Not all carriers support it. Check with your provider if the toggle isn’t showing — some require you to call in and activate it on your account before it appears (which is more common than you’d think).

Wi-Fi Calling routes calls through your internet connection instead of the cellular network. In weak-signal spots — basement apartments, thick-walled buildings, rural stretches with spotty LTE — this is often the only fix that works.

Try moving your location

It’s possible that you’re in a location that has poor service — good enough that your phone thinks it has cellular service, and you’ll see a bar or two of signal strength at the top of your phone — but bad enough that it can’t actually complete a connection. Try to make a call in another location. If you’re indoors, go outside, or otherwise try to change your location and make a call.

Turn Off Do Not Disturb

If you’re having trouble receiving calls rather than making them, go to Settings > Focus > Do Not Disturb and make sure it’s switched off. It’s easy to miss. Long-pressing the crescent moon icon in Control Center — or even just an accidental swipe through that menu — is all it takes to switch it on without realizing it.

Do not disturb settings on iPhone

Do Not Disturb silences incoming calls (it’s the feature’s entire purpose), and from the caller’s side that’s completely indistinguishable from a call failure.

Turn Off Call Forwarding

Turn off call forwarding by going to Settings > Apps > Phone > Call Forwarding. It’s worth a look. If it’s on and pointing to a number that’s unreachable, disconnected, or just no longer active, your iPhone will route every single call there first — and fail every time without any explanation.

Call forwarding is one of those settings most people never touch (some people don’t even know it exists), which means it can be on for months without anyone realizing.

Restart your iPhone

The next step you can take if your iPhone call failed is to restart your device. Restarting your iPhone can fix a variety of small issues by allowing of its programs to shut down naturally. Simply turn your iPhone off, wait a minute, and then turn it back on again.

If a standard restart doesn’t help, try a force restart: press and release Volume Up, press and release Volume Down, then press and hold the Side button until the Apple logo appears. This clears more from memory than a standard restart and can sometimes fix connection issues that a normal shutdown won’t.

Check For A Carrier Settings Update

Carrier settings updates can help improve the connection between your iPhone and wireless carrier’s network. It’s a good idea to immediately update the carrier settings when an update becomes available.

You’ll typically receive a pop-up on your iPhone when a carrier settings update is available. Tap Update if you see that notification.

You can manually check for a carrier settings update by connecting your device to the internet and following these steps:

  • Go to Settings.
  • Tap General.
  • Tap About.
  • A pop-up will appear if a carrier settings update is available. Tap Update if it does.
  • If no pop-up appears, move onto the next step.

Check For An iOS Update

Apple routinely releases iOS updates to fix known bugs and occasionally introduce new features. We recommend installing new iOS updates and see if that will fix your problem.

  • Go to Settings.
  • Tap General.
  • Tap Software Update.
  • Tap Update Now if an update is available.

Eject And Reinsert The SIM Card

If your iPhone has a physical SIM card, there’s a chance that there’s a problem with the way the SIM card is seated in its tray, and the phone can have trouble reading all the contacts on the card. Ejecting and reseating the SIM card can help fix this problem.

As long as you are careful, it’s not hard to eject the SIM card from your iPhone. Switch off your phone first. Then, use the SIM ejector tool to push into the hole beside the SIM tray to release it. Take out the SIM card and check for damages before putting it back in properly.

If your iPhone is an iPhone 14 or later bought in the United States, there’s no physical SIM card slot — it uses an eSIM embedded directly in the chip instead. Your carrier can sort out most eSIM issues remotely, so give them a call and ask them to check the status of your line.

Reset your network settings

If you’ve tried everything else and your iPhone can’t complete any phone calls due to the Call Failed error, we recommend that you reset your phone’s network settings.

Save this as a last resort, because this troubleshooting step will erase all your network settings. This means you’ll have to reenter your Wi-Fi passwords and reconfigure any virtual private networks on your iPhone. It’s a little bit of an inconvenience, but it can fix the problem when calls fail on your iPhone.

  • Go to Settings.
  • Tap General.
  • Tap Transfer or Reset iPhone.
  • Tap Reset.
  • In the pop-up menu, select Reset Network Settings.
  • Enter your iPhone’s Passcode.
  • Select Reset Network Settings to confirm your decision.

Contact your carrier

Before you call, check whether your carrier is experiencing a service outage in your area — most carriers have a status page on their website and an outage checker built into their app. If there is an outage, there’s not much anyone can do until the carrier resolves it on their end.

If resetting network settings didn’t work, it’s time to contact your wireless carrier for assistance. Since calls are failing, you might need to visit the carrier’s store. There might be an issue with your account only a customer support representative can resolve.

iPhone Call Failed Problem: Fixed!

If your carrier comes up empty and calls are still failing on your iPhone, contact Apple Support. You can reach them at apple.com/support, by phone (the Apple Support app makes this especially easy), or by booking a Genius Bar appointment at your nearest Apple Store. Getting a diagnosis costs nothing. Should Apple’s diagnostics find a problem with your iPhone’s cellular radio, they can arrange a repair or replacement — not the most common outcome here, but worth knowing you have that option.

You’ve fixed the problem and your iPhone calls aren’t failing anymore. Share this article on social media to teach your friends and family what to do if calls fail on their iPhone. Thanks for reading.

FaceTime Not Working on iPhone? Here’s The Real Fix!

By Moses Johnson · March 25, 2026

  • If FaceTime is not working on your iPhone, there may be many reasons why, some of which are out of your control.
  • Before troubleshooting, you should check for certain factors, such as whether or not there’s a FaceTime outage.
  • Try restarting your iPhone and force closing FaceTime before moving on to more involved fixes.
  • If basic fixes don’t work, try signing out of FaceTime, resetting your network settings, or checking your camera and microphone.
  • Otherwise, there are several ways you can troubleshoot to get the app back up and running.

If FaceTime is not working on your iPhone, don’t worry, there are a lot of things you can do to try and fix it. You just have to know where to start.

Here’s a breakdown of why your FaceTime app is not working on your iPhone, and troubleshooting tips to try.

How to troubleshoot when FaceTime isn’t working on iPhone

Make sure you have a working internet connection

The first thing you should do when FaceTime is not working on your iPhone is to make sure that your phone is connected to Wi-Fi or your wireless carrier’s cellular data network, and that you can access the internet.

If you are trying to use FaceTime over Wi-Fi, go into your Settings and turn Wi-Fi off and then back on again.

If you’re trying to use FaceTime over cellular, make sure that cellular data is on. Go to Settings and tap Cellular or tap Mobile Data, then turn on Cellular Data. Then scroll down to the Cellular Data section, and make sure FaceTime is enabled for cellular use in the list of apps.

You should also make sure that you are using a fast internet connection to avoid sound quality issues with FaceTime. If your cellular connection or Wi-Fi network runs slowly, or other people stream audio or video on the same Wi-Fi network, you might have these issues:

  • Connection alerts or unable to connect
  • Choppy video calls
  • Black screen
  • Dropped calls

Make sure that both you and the person that you FaceTime with use a fast Wi-Fi or cellular connection.

If you’re on a work or school network that uses a firewall, FaceTime may be blocked at the network level. FaceTime relies on specific ports to connect — and some corporate firewalls restrict those by default. You can ask your network administrator to check Apple’s support page on using FaceTime behind a firewall, or try switching to a personal Wi-Fi or cellular connection to see if that fixes the problem.

Restart your iPhone

Press and hold the Side Button and either Volume button until the power-off slider appears on your screen, then drag the slider to turn your iPhone off. Wait about 10 seconds, then press and hold the Side Button again until you see the Apple logo.

Restarting clears out temporary glitches that pile up in the background — things like stuck network processes or misbehaving app states that you’d never notice until something like FaceTime refuses to connect. It sounds almost too basic, but a restart fixes FaceTime issues more often than most people expect. If your calls have been dropping, lagging, or producing that robotic audio distortion (and I do mean robotic, not just a little choppy), a fresh reboot is the fastest thing to try before you go digging through settings.

Update your iPhone’s software

If you experience issues with receiving a FaceTime call after set up, update your iPhone to the latest version of iOS. Go to Settings > General > Software Update, then install any pending updates. See this article if you can’t update your iPhone.

Software update screen on iPhone

Check that FaceTime is turned on

Go into your iPhone’s Settings app, tap Apps, tap FaceTime, and make sure that the toggle next to FaceTime is enabled.

Screenshot showing FaceTime settings on iPhone

If FaceTime says “Waiting for activation,” turn FaceTime off, restart your phone, then turn FaceTime back on. It might take up to 24 hours for your carrier to verify your phone number with Apple. Contact your carrier to make sure that you can send and receive SMS messages and wait up to 24 hours after you try the troubleshooting steps above.

If you’re using an iPhone with both an eSIM and a physical SIM (or two eSIMs), make sure the phone line you want to use with FaceTime is selected and turned on. Go to Settings > Cellular, and check that the correct line is active. A deactivated or misconfigured SIM — even an old one you’re not using anymore — can interfere with FaceTime activation in ways that aren’t obvious at all.

If you aren’t seeing FaceTime at all, go from the Settings app to Screen Time, and then Content & Privacy Restrictions, followed by Allowed Apps & Features. Then make sure both the camera and FaceTime are allowed by that device.

Make sure you’re signed in

To use FaceTime on your iPhone, you need to be signed in with your Apple Account email address or phone number. You can check this by going to Settings > Apps > FaceTime and making sure that below You Can Be Reached By FaceTime At, your phone number or Apple Account email address are selected.

Sign out of FaceTime and sign back in

Go to Settings > Apps > FaceTime, tap your Apple Account at the top, then tap Sign Out. Restart your iPhone, go back to that same screen, and sign in again with your Apple Account.

Screenshot showing FaceTime sign out screen on iPhone

This does something a little different from toggling FaceTime off and on. When you sign out completely, you’re forcing your iPhone to re-establish its connection with Apple’s FaceTime servers from scratch — refreshing your authentication, your registered phone number, and your email addresses all at once. It’s the kind of fix that tends to work when FaceTime has been stuck in a weird half-connected state for days, where calls fail but the app doesn’t give you a clear error message.

Make sure your date and time settings are correct

We recommend checking your iPhone’s Date & Time Settings. FaceTime won’t work on your iPhone if the date and time are incorrect, especially if your device thinks it is in the future.

Go to Settings > General > Date & Time. Then, turn on the switch next to Set Automatically if it’s not on already.

Date and time settings on iPhone

Check if FaceTime is down

There’s a chance that FaceTime is down on Apple’s end. Check Apple’s System Status page to learn whether FaceTime is experiencing a service outage.

Force close and reopen FaceTime

Swipe up from the bottom of your screen and pause in the middle to open the App Switcher, find the FaceTime app card, then swipe it up and off the screen to close it. Wait a few seconds and open FaceTime again.

iPhone App Switcher

If FaceTime froze mid-call, gave you a black screen, or just stopped responding after you answered, force closing the app can clear the problem without restarting your entire phone. This is different from a restart — you’re only killing the FaceTime process itself, which takes about 3 seconds and doesn’t affect anything else. It won’t help with deeper issues like activation errors or network problems, but for a FaceTime app that’s acting glitchy or unresponsive, it’s the quickest thing to try.

Check your iPhone’s camera and microphone

Open the Camera app and make sure it captures video on both the front and rear cameras, then open Voice Memos, record a short clip, and play it back to confirm the microphone is picking up sound.

If you can see yourself in FaceTime but the other person can’t see or hear you — or the reverse — the issue might not be with FaceTime at all. A camera or microphone that isn’t producing anything points to a hardware problem rather than a software one, and no amount of toggling settings or restarting will fix damaged hardware. On the other hand, if both the Camera app and Voice Memos work perfectly fine, you know for certain the issue is specific to FaceTime or your connection, which narrows things down quite a bit.

Figure out whether the problem is on your end or someone else’s

Keep in mind that FaceTime problems can be caused by a problem with your iPhone — or with the person you’re trying to call.

Does FaceTime not work with anyone or just one person? If necessary, call several people and see whether the problem is limited to one person or to everyone.

Here’s a helpful rule of thumb: If FaceTime is not working with anyone, it’s probably a problem with your iPhone. If it doesn’t work with just one person, it’s probably a problem on the other person’s iPhone, iPad, or Mac.

If FaceTime won’t connect to one specific person, check whether you’ve accidentally blocked them. Go to Settings > Apps > FaceTime, scroll down to Blocked Contacts, and look for their name. Blocking someone stops FaceTime calls in both directions, and it’s surprisingly easy to block a contact by mistake.

You should also check whether Focus mode or Do Not Disturb is turned on. When Focus is active, incoming FaceTime calls may be silenced or blocked entirely depending on how your Focus filters are set up. Open Control Center and look for the Focus icon — if it’s highlighted, tap it to turn it off and try the call again.

Reset your network settings

Go to Settings > General > Transfer or Reset iPhone, tap Reset, then tap Reset Network Settings. You’ll need to enter your passcode to confirm.

Save this one for when the easier fixes haven’t worked, because resetting your network settings wipes out all of your saved Wi-Fi passwords, VPN configurations, and Bluetooth pairings. Your iPhone has to reconnect to everything from scratch afterward. But if FaceTime stopped working after a software update or after you switched carriers (which is a lot more common than you’d think), corrupted network settings are very, very often the cause. Once the reset is done and your iPhone restarts, reconnect to your Wi-Fi and try FaceTime again.

Check whether a FaceTime feature is available

Even if both you and the person you’re trying to contact have a FaceTime account, that may not be all of the story. FaceTime and FaceTime audio calling are not available for all countries, regions, or carriers.

You can check Apple’s website to learn which countries and carriers do and do not support FaceTime. Unfortunately, If you’re trying to use FaceTime in an unsupported area, there’s nothing you can do to make it work.

If nothing has worked

If you’ve gone through every step above and FaceTime still won’t work on your iPhone, the problem may be something you can’t fix on your own. Contact your wireless carrier first — activation issues, account restrictions, and SMS verification problems all fall on their side, and they can check things that aren’t visible to you in your iPhone’s settings.

If your carrier confirms everything looks fine on their end, your next step is Apple Support. You can reach them through the Apple Support app, by phone, or by scheduling a visit at an Apple Store. There’s a chance the issue is hardware-related — a failing cellular antenna or a damaged microphone won’t show up in any settings menu — and Apple’s diagnostics can catch problems that troubleshooting steps can’t.

As an absolute last resort, you can try resetting all settings on your iPhone by going to Settings > General > Transfer or Reset iPhone > Reset > Reset All Settings. This won’t erase your photos, apps, or data, but it will reset every preference on your phone back to factory defaults — Wi-Fi passwords, wallpaper, notification settings, all of it. It’s a pain to set everything back up, but it can resolve deep software issues that individual fixes miss.

Are YOU charging your iPhone correctly?

By Moses Johnson · January 4, 2026

You should always let your iPhone battery reach zero before you charge it up. Charging your iPhone overnight is bad for it, and you should always charge on airplane mode.

Be honest, how many of those claims have you heard? Better still, how many have you believed?

Well, not surprising, there are a lot of claims out there regarding the charging of iPhone batteries, but how many of them are true?

That’s what I’m going to try and find out in this article. I’m going to look at 10 common claims regarding the charging of iPhone batteries and find out whether they’re true or false.

Read through to the end of the article. I reckon there’s going to be at least one claim in here that you can officially stop worrying about.

Let’s get into it.

—

1. Charging your phone overnight isn’t good for it

This is a bit of a classic, really, isn’t it?

I think we’ve all heard this at one point or another, this idea that we should only ever be charging our phone when we’re able to keep an eye on it and remove it from charge the second that it’s full, for fear of it somehow overloading.

Quite simply, any quality modern device like a smartphone, or a tablet, or a laptop, or a smart watch is not going to overcharge, even if you leave it on the charger overnight.

Your iPhone has the smarts to know when your battery is full, and it will essentially stop charging at that point. And if the battery depletes sufficiently enough while the phone is still on the charger, it will then charge again to top it up.

In fact, if you’ve recently picked up your iPhone in the middle of the night whilst it’s charging, you might notice that it now uses optimized charging.

This is where the phone will immediately begin charging when you plug it in. But if it knows that you’ve got it plugged in overnight, and if the phone knows that your routine is usually to sleep until, say, 7am, the phone will only charge to around 80% initially and then finish off charging much closer to your waking up time.

This not only means that your phone is full and ready to go in the morning, it means that rather than blasting the battery with a full, high-speed charge very quickly, it can charge it much more gradually, which is better for the battery’s overall health.

If you want to see whether you’ve got this feature enabled on your iPhone, head to Settings > Battery Health & Charging and ensure that Optimized Battery Charging is enabled.

Notice here that you can also see the current maximum capacity or chemical health of your battery.

—

2. You shouldn’t charge your phone under your pillow

This is true, but not necessarily for the reason that you might expect.

Let’s put concerns about your phone with all its radioactivity being that close to your head overnight to one side for a moment.

The process of recharging a phone battery generates heat. Not enough heat to set fire to your bedding—if that’s happening, you’ve got a faulty phone or battery—but heat nevertheless.

Heat is the number one enemy of modern lithium-ion batteries and can cause severe permanent damage to it.

This is the main reason why you should never leave your iPhone sitting out in the hot sun, and why your iPhone will warn you if it begins to reach a dangerous temperature level. And whilst it might not reach those same temperatures when charging under your pillow, prolonged exposure to that kind of temperature is really not good for the battery at all and is a guaranteed way to reduce its lifespan.

To be fair, extreme heat isn’t good for any part of your phone, so leaving your phone out in the sun is just something you should avoid at all costs.

If you’re charging your phone overnight, do so in a place where it’s got plenty of room for airflow. Sitting on your bedside table or a charging pad should be more than sufficient, and don’t cover it with anything.

If the screen lighting up is an issue for you, either change the phone settings to have it not disturb you, or just sit it with the screen facing down rather than up.

—

3. The cable you’re using doesn’t matter

This isn’t true.

Technically, any cable with the right connector can charge your phone, but just because something can do something doesn’t mean that it should.

You wouldn’t apply the same logic to your brake pads for your car or windows for your house.

There are certain products where you really need them to be up to a certain standard, even if it means paying a little bit more.

This doesn’t mean that you have to buy official Apple cables, by the way.

Apple do charge a premium, but you should also avoid the absolute bargain-basement cables unless they’re coming from a reputable manufacturer or retailer.

You need to know that the cable you’re using is MFI certified.

MFI stands for Made for iPhone, and it’s an Apple licensing program that covers all manner of iPhone peripherals.

An MFI certified product will be allowed to display the badge on their packaging, and when it comes to a charging cable, it means that the cable can pass power to your phone correctly without risk of it overcharging.

MFI cables aren’t expensive in the grand scheme of things, so whilst it can be tempting to go for the absolute cheapest cables that you can, I’d advise you not to.

—

4. You should fully discharge your battery each time before charging

The need for fully discharging your battery is another popular battery myth and simply isn’t the case these days, thanks to the type of battery that phones use.

There are lots of different types of batteries out there. Some, like nickel-cadmium batteries, for example, should be nearly completely discharged before charging them up again, while lead-acid batteries should never be fully discharged.

Thankfully, lithium-ion batteries—the type found in modern phones—are much more forgiving and built for the kind of charging and discharging patterns you’d expect from a regular consumer.

So long as you’re following the other battery advice, things like not allowing them to overheat, and using certified cables and chargers with them, you can charge your phone fully overnight if you like, or you can plug in for 10 minutes for a quick top-up right before you go out, or a combination of all these things.

It really doesn’t matter. The battery on your phone has been built to work around you, and not the other way around.

—

5. You should charge using airplane mode

This one isn’t true, but it’s also not false as such.

The belief here is that charging on airplane mode will allow you to charge your phone much faster than charging it in regular mode, and this isn’t entirely false.

Airplane mode essentially shuts down all of the wireless communication features of your device—so no wi-fi, no cellular connection. As your phone is typically constantly looking to create and maintain wi-fi and cellular connections whilst it’s powered on, this will reduce some of the power usage of the phone.

The charge coming into the phone isn’t any more powerful. It’s just that the incoming power isn’t being offset by power usage as much.

But if you really want to charge your phone up more quickly, say in an emergency, a much more effective way to do this would be to power off your phone and charge it with the power off.

Because even in airplane mode, your phone is still using power—power for the screen, power for any apps that might be running, or apps you have running in the background.

An analogy would be filling a bucket of water that has a number of holes. If airplane mode plugs one of those holes, the bucket will fill up faster. But if there are still some other holes, you’re still going to lose water.

It’s only by plugging all the holes that you’ll be able to really take advantage of all of the water you’re pouring in, and that’s kind of the case with your phone and charging it.

But even then, it’s generally considered that with a good fast charger, unless you’re power using your phone at the same time that you’re charging it, you should be able to quickly charge your phone up without the need to put it into airplane mode.

Keep in mind, airplane mode basically renders the phone element of your phone useless, and you have to question whether it’s worth it just to slightly speed up your charging.

If it is, power the phone off, give it a rapid charge, then power it back on.

—

6. Batteries have a memory

This is kind of the same belief as the idea that batteries must always be fully discharged.

It just isn’t true with modern lithium-ion batteries.

Where some people get mistaken is mixing up battery memory with battery health.

You can find out your battery health by going into your iPhone Settings, choosing Battery, and then Battery Health & Charging.

My iPhone 15 Pro Max, purchased about seven months ago, still has 100% battery health, which is excellent. But if I was leaving this out in the sun all day, perhaps using dodgy cables with it, that figure could have dropped.

If this was, say, 80%, that just means that I’ve got 80% battery capacity to play with compared to the 100% that I had when it was new.

So, if a new battery would give me 10 hours of constant use—purely for illustrative purposes—then I would expect to get only eight hours off of a full charge when I’ve got 80% capacity.

But this aging process is, unfortunately, entirely normal.

Apple allude to it here when they talk about your iPhone battery chemically aging.

Your battery has a limited number of charge cycles in it before it can’t charge anymore, which is why, if you have a particularly old iPhone, you’re going to notice that it isn’t lasting as long as it did when you first got it, no matter how careful you might have been with regard to charging it.

When you reach this point, the best thing you can do is swap out your phone. A brand new phone will, of course, have a brand new battery. Or, if that’s not an option for you, a battery swap would also be a good solution, and there are companies out there that can help you with this.

—

7. You should use low power mode all the time

This is another myth that is more of an opinion than an absolutely factual answer. But I’m going to call this one false—you don’t need to use low power mode all the time.

Low power mode is exactly what it sounds like. It will switch your phone into a mode where it impacts a number of the power-hungry features of your phone.

According to Apple themselves, this includes 5G data, auto-lock, display brightness, display refresh rate, some visual effects, iCloud photos, automatic downloads, email fetch, and background app refresh.

You might be perfectly fine with some of these being disabled, but many of these features are what makes the iPhone experience so good, so it would be a shame to routinely switch them all off.

I guess the comparison would be buying a Porsche but installing a limiter that stops it from going over 20 miles an hour.

Low power mode is designed to eke out the last bit of power that your phone has, which is why Apple will suggest you switch it on once your phone reaches 20% or 10% power.

It’s there to help keep your phone running for just that little bit longer until you can get it plugged in to charge.

Also, keep in mind that once you reach 80% charge, low power mode will automatically switch off, so you can see that from Apple’s perspective, this isn’t a feature they expect you to have on all the time.

—

8. You can save battery by closing apps

This is another myth; quite the opposite is generally true.

The theory behind this is that phones that have apps running in the background are having to dedicate battery to those apps. So if you have 10 or 20 apps running in the background, that’s 10 or 20 lots of power from your battery that’s being dedicated to running apps that you’re not actively using. So closing them down would save you some battery life.

The reality is that your iPhone is built for multitasking, and in general, it’s very good at putting those background apps into a low-power, near-idle state.

Essentially, those apps aren’t running in the same way that the app you’re currently using is, but when you swipe on your phone to move from an active app to a background app, your phone has that background app in a state that makes it very easy for it to spring to life.

For you, the user, the experience feels like all of the apps are constantly running, so the fact that they aren’t is irrelevant to you.

This is actually one of those myths where the opposite is true.

Opening up apps is the thing that requires the most power usage, so constantly closing your apps down and then opening them up again can use more of your battery life, not less.

Think of it like an oven or a kettle. In general, it takes more electricity to heat your oven up or boil a kettle of water than it does to simply maintain a high temperature.

A professional kitchen will heat up their oven and then hold it at that temperature for the duration of the shift because it doesn’t make energy-efficient sense to keep powering something on, waiting for it to heat up, powering it off, and then repeating the process.

So yeah, use your apps as you wish. Your phone’s built-in multitasking smarts have got you covered.

You can force quit an app if something goes wrong with it, but other than that, you’re good.

—

9. You shouldn’t use your phone while it’s charging

This is kind of a myth.

The truth element of this comes from the fact that when your phone is charging—especially if it’s fast charging—that fast charge is putting some stress on the phone and the battery.

If you use your phone while it’s plugged in, most phones will automatically default to a low-power charge mode to allow the phone to continue drawing the power it needs to do what you want it to do while it’s charging.

You’re absolutely fine to use your phone while it’s charging. You’re not going to be putting yourself at any risk, nor are you damaging your battery.

The only real consequence you’re going to face is that your battery isn’t going to charge as quickly as it might if you simply plug it in, leave it alone, and allow it to fast charge.

But ultimately, you’re the consumer—it’s your phone, and you should use it how you wish. So I really wouldn’t worry too much about this.

—

10. Fast charging kills your battery

Again, another myth.

Fast charging has gone from being a kind of “oh, by the way, we have fast charging” feature a few years ago to a major, significant, almost dealbreaker feature of modern smartphones—and for good reason.

The latest iPhones are essentially insanely powerful computers that you carry around with you in your pocket, and with each year, their capabilities become even more impressive.

Consumers would be more than happy with more powerful, longer-lasting batteries provided that doesn’t equal a thicker phone. And while battery tech is improving all the time, an area where manufacturers have realized they can make improvements and increase consumer satisfaction is charge time.

If you can get to the point where a battery can be fully charged from 0% to 80% in only 10 minutes, battery capacity suddenly isn’t so much of an issue.

You could power use your phone all day long, then plug in for a quick charge while you have a coffee.

Plus, the charge on your iPhone isn’t that fast, certainly not compared with what some other phone manufacturers are doing right now.

The iPhone 15 Pro Max can charge at up to 27 watts with a compatible charger, and tests have shown that a Pro Max phone can charge from empty to full in around 90 minutes at this speed. Which is quick, but when you consider that there are phones like the Vivo IQ 7 which features 120-watt charging and can go from empty to full in 18 minutes, you realize that Apple is moving along carefully with this.

Apple sells millions of iPhones, and it really isn’t in their interest at all to sell phones where the battery seriously degrades each time you charge it.

Part of the technology behind this is the same kind of technology that stops phones from overcharging.

With fast charging, your iPhone will automatically receive a charge in different phases.

The first phase of the charge is the higher voltage phase, charging your battery from anywhere from 50% to 80% capacity very quickly, which does generate some extra heat and put some stress on the battery.

But for the remaining part of the charge, your phone will switch to a slower trickle charge phase, massively reducing the stress on the battery for that part of the charge, keeping the charge process both safe and healthy for your battery.

It’s why you’ll often see a notification informing you of exactly how long you’ve got left in your current charge cycle and what time the iPhone will be fully charged by.

Your phone is smart enough to be able to calculate exactly how long the charge is going to take.

So fast charge away, and as and when Apple releases even faster-charging iPhones, you can be pretty confident that they will have done their homework prior to launching the phones.


So there you go, 10 claims about battery charging with my thoughts on whether or not there’s something you need to worry about.

I think the main takeaway throughout all of this is that ultimately you’re the consumer—it’s your phone, and you should use it how you like.

Phone manufacturers like Apple know this, and they build their devices around your usage habits.

They don’t expect you to significantly change what you do to work for them.

Use your phone how and when you want to use it, charge it how and when you want to charge it, and trust that your phone is smart enough to be able to take care of itself.


What about you? How often do you charge your phone? Or are there any battery charging myths or tips that I’ve not included here?

Drop me a comment and let’s talk about it.

How to make a Genius Bar appointment

By Moses Johnson · March 24, 2026

Do you have a problem or a question relating to your Apple products? Apple offers a variety of tech support options for its customers. Some of the support options include (a) phone (b) live chat (c) email support. However, you may need to get hands-on, personal support and help from an Apple expert, especially if you are having a hardware problem (like a cracked screen problem, water damage, etc). You may have to bring your device to your nearest Apple Store.

Apple offers tech support inside every Apple Retail Store. This support is offered by the Genius Bar stations. Employees of the Genius Bar, called Geniuses, specially trained to help customers with Apple hardware and software.

In order to visit the Genius Bars, you may need to make a reservation. You can make a Genius Bar reservation online before visiting the Apple Store. This article explains how you can make an Apple Genius Bar reservation.

What is the Genius Bar

The Genius Bar is a hands-on technical support station located inside Apple’s retail stores. When you have questions or need support for your Apple products, such as Mac, iPad, Apple TV, Apple Watch, AirPods, or iPhone, you can get expert advice and training at the Genius Bar in any Apple Retail Store.

The Genius Bar employees, called Geniuses, are specially trained and certified Apple experts. The main jobs of the Geniuses are to help Apple users with hardware and software. They can answer your questions, provide personal supports, and offers repairs. Most of the services they provide are free. They can do repairs, but you have to pay for non-warranty services if your device is not covered by the Apple warranty, an AppleCare plan.

You can easily setup Genius Bar appointment. The company offers two ways to make a Genius Bar reservation at an Apple Store:

  1. You can book the appointment using the Apple Store app or,
  2. You can make a reservation via the Apple support website.

1. Make a Genius Bar reservation using Apple Support App for iOS(the easiest way)

  1. Open the Apple Support app on your iPhone (if you do not have it, launch the App Store and download and install it — or click here)
  2. Select Support option at the bottom of the screen.
  3. Select your device. For the purpose of this article, we selected iPhone 16 Pro Max and then Repairs & Physical Damage and Unable to power on. Note that some problems will only let you receive support via phone calls or live chat sessions. How To Make A Genius Bar Reservation using App support app
  4. Tap Make a Reservation and find a location and date and time and then tap Reserve. Then your reservation will be made.

2. Make a Genius bar appointment via Apple web site

Without downloading and installing an app, you can also make a Genius Bar reservation via Apple’s support website. Here is how:

  1. Go to Apple’s Genius Bar web site. (URL: https://www.apple.com/retail/geniusbar/)
  2. Tap Get started to make a reservation.
  3. Sign in with your Apple Account.
  4. Select your device. For the purpose of this article, we chose iPhone 16 Pro Max.
  5. Choose your issue. For the purpose of this article, we chose Repairs & Physical Damage and Unable to power on. Genius Bar reservation online
  6. Tap continue.
  7. Tap Find a location (Make a Reservation)
  8. Choose your location. You can search by address, city or zIP Code. You can also browse all Apple retail stores. Find the closest Apple Store that you want to go to.
  9. Select the date and time, then tap continue.
  10. Review your reservation details., then tap Reserve now. Your reservation will be confirmed. Setup Genius Bar appointment

Now you have your Genius Bar reservation. Apple will also send you a confirmation email. You can easily manage your Genius Bar appointment. You can easily cancel or reschedule it if you want to. Make sure you back up your device before going.

How to prepare for your appointment

Before your appointment, you may want to prepare for your appointment. Do not forget to back up your data (you can use iCloud. Make sure to bring all of the hardware (that you are having issues with) with you. For example, if you are having issues with your Mac, bring all of the accessories such as your mouse, keyboard. You may also be asked for your sales receipt.

Make sure that you know your Apple account password (you may have to turn off Find My).

And lastly, do not forget to bring your ID with you.

Your Genius Bar appointment may last about 15 minutes. If your device needs a hardware repair, the Genius will discuss with you regarding your repair options. This may include any applicable charges.

Primary Sidebar

Trending

A close-up view of the back of iPhone 17 Pro.

iPhone Flashlight Not Working? Here’s The Real Fix

A front and back view of two iPhone 17 Pro devices.

iPhone Black Screen? Here’s The Real Fix!

Battery settings on iPhone

How to Calibrate iPhone Battery: Step-by-Step

Turn on Photos in iCloud Settings

iPhone Photos Not Syncing to iCloud? Here’s The Fix

Screenshot showing auto brightness settings on iPhone

Auto-brightness Not Working on iPhone? Here’s The Real Fix

Footer

Site Links

  • Home
  • Contact us
  • About Us
  • Editorial Principles
  • Our Staff
  • Write For Us
  • Guest Post Policy
  • Accessibility
  • Privacy
  • Terms
  • Copyright Notice

Copyright © 2026 iPhoneArena.com · All Rights Reserved